0. Helm Repetition – Dive into K8s and Helm
Welcome to this hands-on Helm exercise.
TLDR
The goal: reinforce Kubernetes concepts by building a Helm chart for our trusty guestbook app. You’ll start simple, scale gradually, and even pull in dependencies.
In detail we will use Helm for packaging our guestbook app. We will include the deployment, services, the connection configuration, the app configuration and the deployment of MongoDB. This time we will not only deploy MongoDB by ourselves, but also include another offical chart for MongoDB as dependency for our guestbook.
You can use the official documentation of Helm to get help with Helm commands and more information about Helm itself.
Let’s get started.
1. Initialize Helm
Inside your solution directory, create a new folder called helm, then run:
helm create guestbook
Solution
cd solution
mkdir helm
cd helm
helm create guestbook
This creates a new directory guestbook/ with some pre-filled content.
Info
The helm create command generates boilerplate code that you can use as a starting point for your
development. In our case we don’t need all of this, so we will clean up the templates directory.
Clean it up by removing all files in the templates/ subdirectory.
Now, edit the Chart.yaml. This file contains the metadata for your Helm chart. Replace the content with:
apiVersion: v2
name: guestbook
description: A simple web app that displays a guestbook
version: 0.1.0
Think of this as setting the chart’s identity—like naming your pet goldfish before teaching it tricks.
Info
The Chart.yaml file is where you define metadata about your application. We have only defined a minimal set of metadata, but you can add more as needed (e.g. required Kubernetes version).
You can find all parameters at https://helm.sh/docs/topics/charts/#the-chartyaml-file.
2. Minimal Helm Deployment
In this exercise, we will deploy the guestbook and a LoadBalancer Service in a static manner with helm. Below the target architecture is shown.
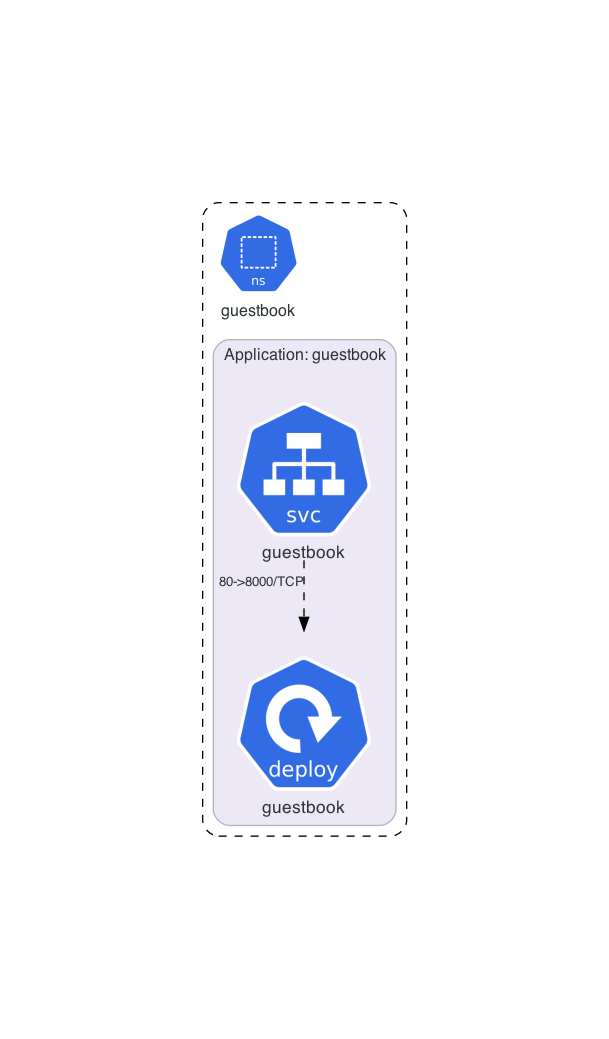
Guestbook Deployment
Let’s start with the first template definition for our application. We will create a Deployment resource for our guestbook.
Do you still remember how to create deployment definitions? Create a yaml file named deployment.yaml in the templates/ directory with the following specification:
name: guestbook
replicas: 1
image: ghcr.io/thinkportrepo/k8s-example-app:latest
containerPort: 8080
Solution
kubectl create deploy guestbook --image ghcr.io/thinkportrepo/k8s-example-app:latest --port 8080 --dry-run=client -o yaml > guestbook/templates/deployment.yaml
apiVersion: apps/v1
kind: Deployment
metadata:
  labels:
    app: guestbook
  name: guestbook
spec:
  replicas: 1
  selector:
    matchLabels:
      app: guestbook
  strategy: {}
  template:
    metadata:
      labels:
        app: guestbook
    spec:
      containers:
      - image: ghcr.io/thinkportrepo/k8s-example-app:latest
        name: k8s-example-app
        ports:
        - containerPort: 8080
        resources: {}
We can test our minimal deployment by running Helm. Helm will create the missing guestbook namespace for us. After installing the Helm chart, we eventually check if the deployment is successful.
helm install guestbook ./guestbook -n guestbook --create-namespace
helm status guestbook -n guestbook
kubectl get deploy -n guestbook
Note
You may ask yourself: Isn’t that the same as just running kubectl apply -f deployment.yaml -n guestbook? Yes, you are correct! At this stage Helm is not templating anything and it will just apply the file during installation.
Info
Helm adds labels the object it deploys to identifiy them as part of a release.
We can have a look at the labels of the deployment by running: kubectl get deploy guestbook -n guestbook -o yaml
  apiVersion: apps/v1
  kind: Deployment
  metadata:
    annotations:
      deployment.kubernetes.io/revision: "1"
      meta.helm.sh/release-name: guestbook
      meta.helm.sh/release-namespace: guestbook
Guestbook external LoadBalancer Service
It’s time to access our guestbook. We won’t use an ingress here, but of course this could also be templated by Helm! We will have a simple start with a Service and the usage of an external LoadBalancer.
Do you still remember how to create an external LoadBalancer Service?
Create a yaml file for a LoadBalancer service to expose the application externally and put it into the templates directory.
service name: guestbook
type: LoadBalancer
port: 80
targetPort: 8080
Hint
You can use a yaml file from the offical Kubernertes docs as template, or you can use the imperative commands with the --dry-run option. There are two possible commands: kubectl expose or kubectl create svc loadbalancer. One of them requires that the deployment is already created and the correct namespace is provided.
Solution
Here we will use the imperative command with `kubectl expose`. It requires that the deployment is already created and the correct namespace is provided. On the downside it will hard-code the namespace in the resulting yaml file. As we are using Helm for the deployment, we should remove the namespace definition at the metadata section in the resulting file.kubectl expose deploy guestbook -n guestbook --type LoadBalancer --port 80 --target-port 8080 --dry-run=client -o yaml > guestbook/templates/service.yaml
kubectl create svc loadbalancer guestbook --tcp=80:8080 --dry-run=client -o yaml > guestbook/templates/service.yaml
apiVersion: v1
kind: Service
metadata:
  labels:
    app: guestbook
  name: guestbook
spec:
  ports:
  - name: 80-8080
    port: 80
    protocol: TCP
    targetPort: 8080
  selector:
    app: guestbook
  type: LoadBalancer
Apply the changes:
helm upgrade guestbook ./guestbook -n guestbook
kubectl get svc -n guestbook
Check that the web app at the external IP is accessible. Voilà, your guestbook lives!
3. Add Dynamic Values
Now, having the basic app running, we will use the big advantage of Helm: The templating function.
While Helm and its go-based templating-language can generate complex dynamic configurations, we will start very simple.
So now it’s time to make the app configurable. Edit values.yaml as follows:
guestbook:
  deployment:
    replicaCount: 1
    image: ghcr.io/thinkportrepo/k8s-example-app:latest
  service:
    type: LoadBalancer
    port: 80
    targetPort: 8080
As you see, we are moving the parameters out of the template files and include them in the values.yaml file. This makes it easier to manage the configuration and allows us to have a one chart that can be deployed in different environments and with complete different options. Many public charts are heavy configurable allowing them to be run on very different environments (e.g. LoadBalancer vs. Ingress).
The values.yaml file
The values.yaml file is where you define the values of the chart which are used in the templates (and set their default values).
You can override these values when you run helm install or helm upgrade by specifying them on the command line or by using an other file.
#Using another file
helm install -f myvals.yaml ./mychart
#Using set parameter
helm install --set foo=bar ./mychart
Update your template files to use the values of the values.yaml with:
{{ .Values.guestbook.<resource>.<parameter> }}
It is also good practise to specifiy the namespace by variable to ensure all Helm commands will generate the correct output (e.g. helm template does not automatically set the namespace):
namespace: {{ .Release.Namespace }}
Info
The {{}} syntax tells Helm that templated content is specified. A guide to all options is available at https://helm.sh/docs/chart_template_guide/
Try tweaking values, then run helm upgrade. You can also experiment with rollbacks. This is where Helm really shines.
Solutions
Your templates should like those ones:apiVersion: apps/v1
kind: Deployment
metadata:
labels:
app: guestbook
name: guestbook
namespace: {{ .Release.Namespace }}
spec:
replicas: {{ .Values.guestbook.deployment.replicaCount}}
selector:
matchLabels:
app: guestbook
strategy: {}
template:
metadata:
labels:
app: guestbook
spec:
containers:
- image: {{ .Values.guestbook.deployment.image}}
name: k8s-example-app
ports:
- containerPort: 8080
resources: {}
apiVersion: v1
kind: Service
metadata:
  creationTimestamp: null
  labels:
    app: guestbook
  name: guestbook
  namespace: {{ .Release.Namespace }}
spec:
  ports:
  - name: guestbook
    port: {{ .Values.guestbook.service.port}}
    protocol: TCP
    targetPort: {{ .Values.guestbook.service.targetPort}}
  selector:
    app: guestbook
  type: {{ .Values.guestbook.service.type}}
4. Add MongoDB for Persistence
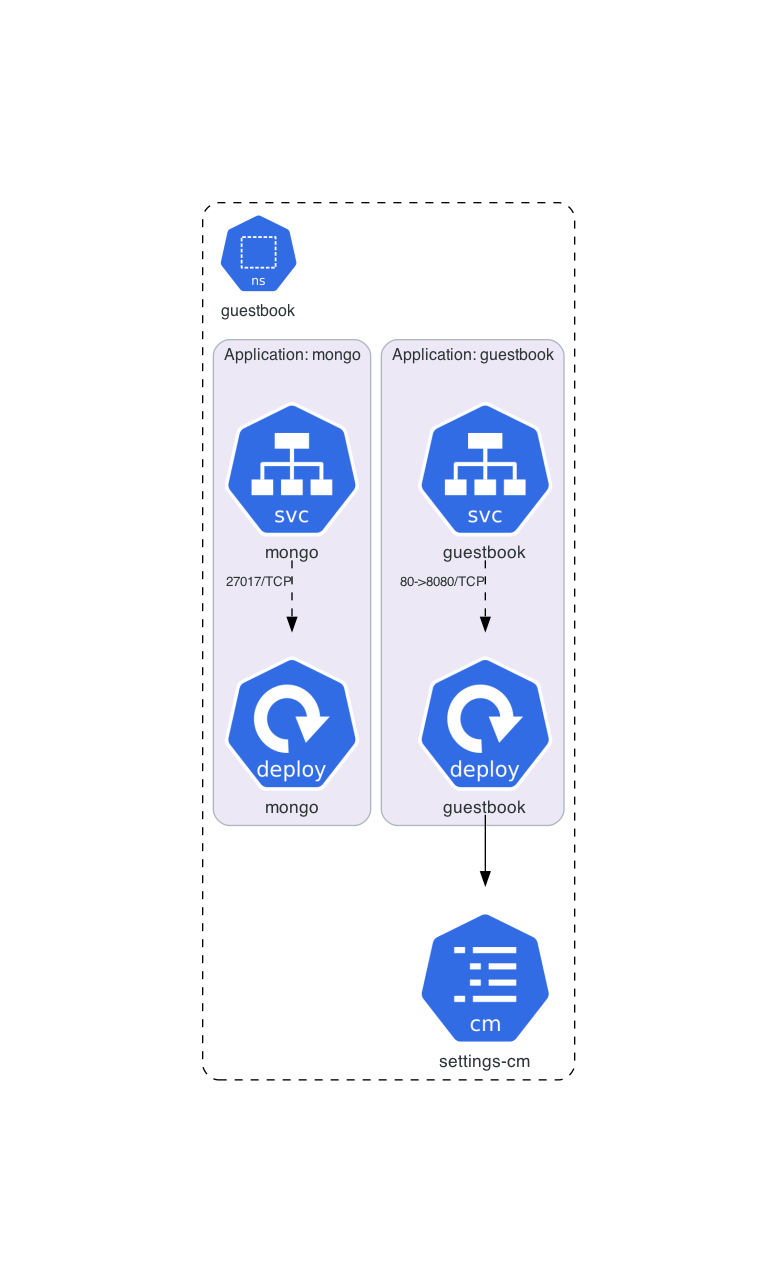
Now let’s add a MongoDB deployment to persist data. In this first step we will deploy MongoDB by ourselfes.
For simplicity, we’ll skip secrets, volumes and use environment variables defined in values.yaml.
mongo:
  username: mongouser
  password: super-secret-password
MongoDB Deployment
Create a deployment for Mongo:
name: mongo
replicas: 1
image: mongo
containerPort: 27017
Solution
k create deploy mongo --image mongo --port 27017 --dry-run=client -o yaml > guestbook/templates/mongo-deployment.yaml
Now, add the environment variables to the container spec and map them to the template values:
 MONGO_INITDB_ROOT_USERNAME: {{ .Values.mongo.username }}
 MONGO_INITDB_ROOT_PASSWORD: {{ .Values.mongo.password }}
Solution
apiVersion: apps/v1
kind: Deployment
metadata:
  creationTimestamp: null
  labels:
    app: mongo
  name: mongo
  namespace: {{ .Release.Namespace }}
spec:
  replicas: 1
  selector:
    matchLabels:
      app: mongo
  strategy: {}
  template:
    metadata:
      creationTimestamp: null
      labels:
        app: mongo
    spec:
      containers:
      - image: mongo
        name: mongo
        ports:
        - containerPort: 27017
        env:
        - name: MONGO_INITDB_ROOT_USERNAME
          value: {{ .Values.mongo.username }}
        - name: MONGO_INITDB_ROOT_PASSWORD
          value: {{ .Values.mongo.password }}
Apply changes:
helm upgrade guestbook ./guestbook -n guestbook
MongoDB Cluster IP Service
Now expose MongoDB internally via a ClusterIP service so that our guestbook app can connect to it:
name: mongo
port: 27017
Solution
As above also `kubectl create svc clusterip mongo --tcp=27017` could be used.k expose deploy mongo --port 27017 --dry-run=client -o yaml > guestbook/templates/mongo-service.yaml
helm upgrade guestbook ./guestbook -n guestbook
apiVersion: v1
kind: Service
metadata:
  creationTimestamp: null
  labels:
    app: mongo
  name: mongo
  namespace: {{ .Release.Namespace }}
spec:
  ports:
  - name: "27017"
    port: 27017
    protocol: TCP
    targetPort: 27017
  selector:
    app: mongo
  type: ClusterIP
Guestbook App Configuration
As you maybe remember, our guestbook app has an app.yaml file which can be used to configure it (besides to the environment variables or cli arguments.) The configuration file has the following content:
backend: mongo
configuration:
  mongo:
    host: "mongo"
    port: "27017"
    user: ""
    password: ""
Create a ConfigMap as template for Helm and mount the ConfigMap into the guestbook app. Use the file in ~/exercise/helm/app.yaml to create the ConfigMap:
Solution
kubectl create configmap settings-cm --from-file ~/exercise/helm/app.yaml --dry-run=client -o yaml > guestbook/templates/config-map.yaml
In the fundamentals course, we used enviroment variables (and secret references) to configure username and password. In this exercise you can define them directly in the ConfigMap - so add the template variables to the ConfigMap.
Solution
apiVersion: v1
data:
  app.yaml: |-
    backend: mongo
    configuration:
      mongo:
        host: "mongo"
        port: "27017"
        user: "{{ .Values.mongo.username }}"
        password: "{{ .Values.mongo.password }}"
kind: ConfigMap
metadata:
  creationTimestamp: null
  name: settings-cm
  namespace: {{ .Release.Namespace }}
Finally, update the guestbook deployment to mount the ConfigMap.
Solution
apiVersion: apps/v1
kind: Deployment
metadata:
  labels:
    app: guestbook
  name: guestbook
  namespace: {{ .Release.Namespace }}
spec:
  replicas: {{ .Values.guestbook.deployment.replicaCount}}
  selector:
    matchLabels:
      app: guestbook
  strategy: {}
  template:
    metadata:
      labels:
        app: guestbook
    spec:
      containers:
      - image: {{ .Values.guestbook.deployment.image }}
        name: k8s-example-app
        resources: {}
        volumeMounts:
        - mountPath: /app/k8s-example-app/app.yaml
          name: config-volume
          subPath: app.yaml
      volumes:
      - name: config-volume
        configMap:
          name: settings-cm
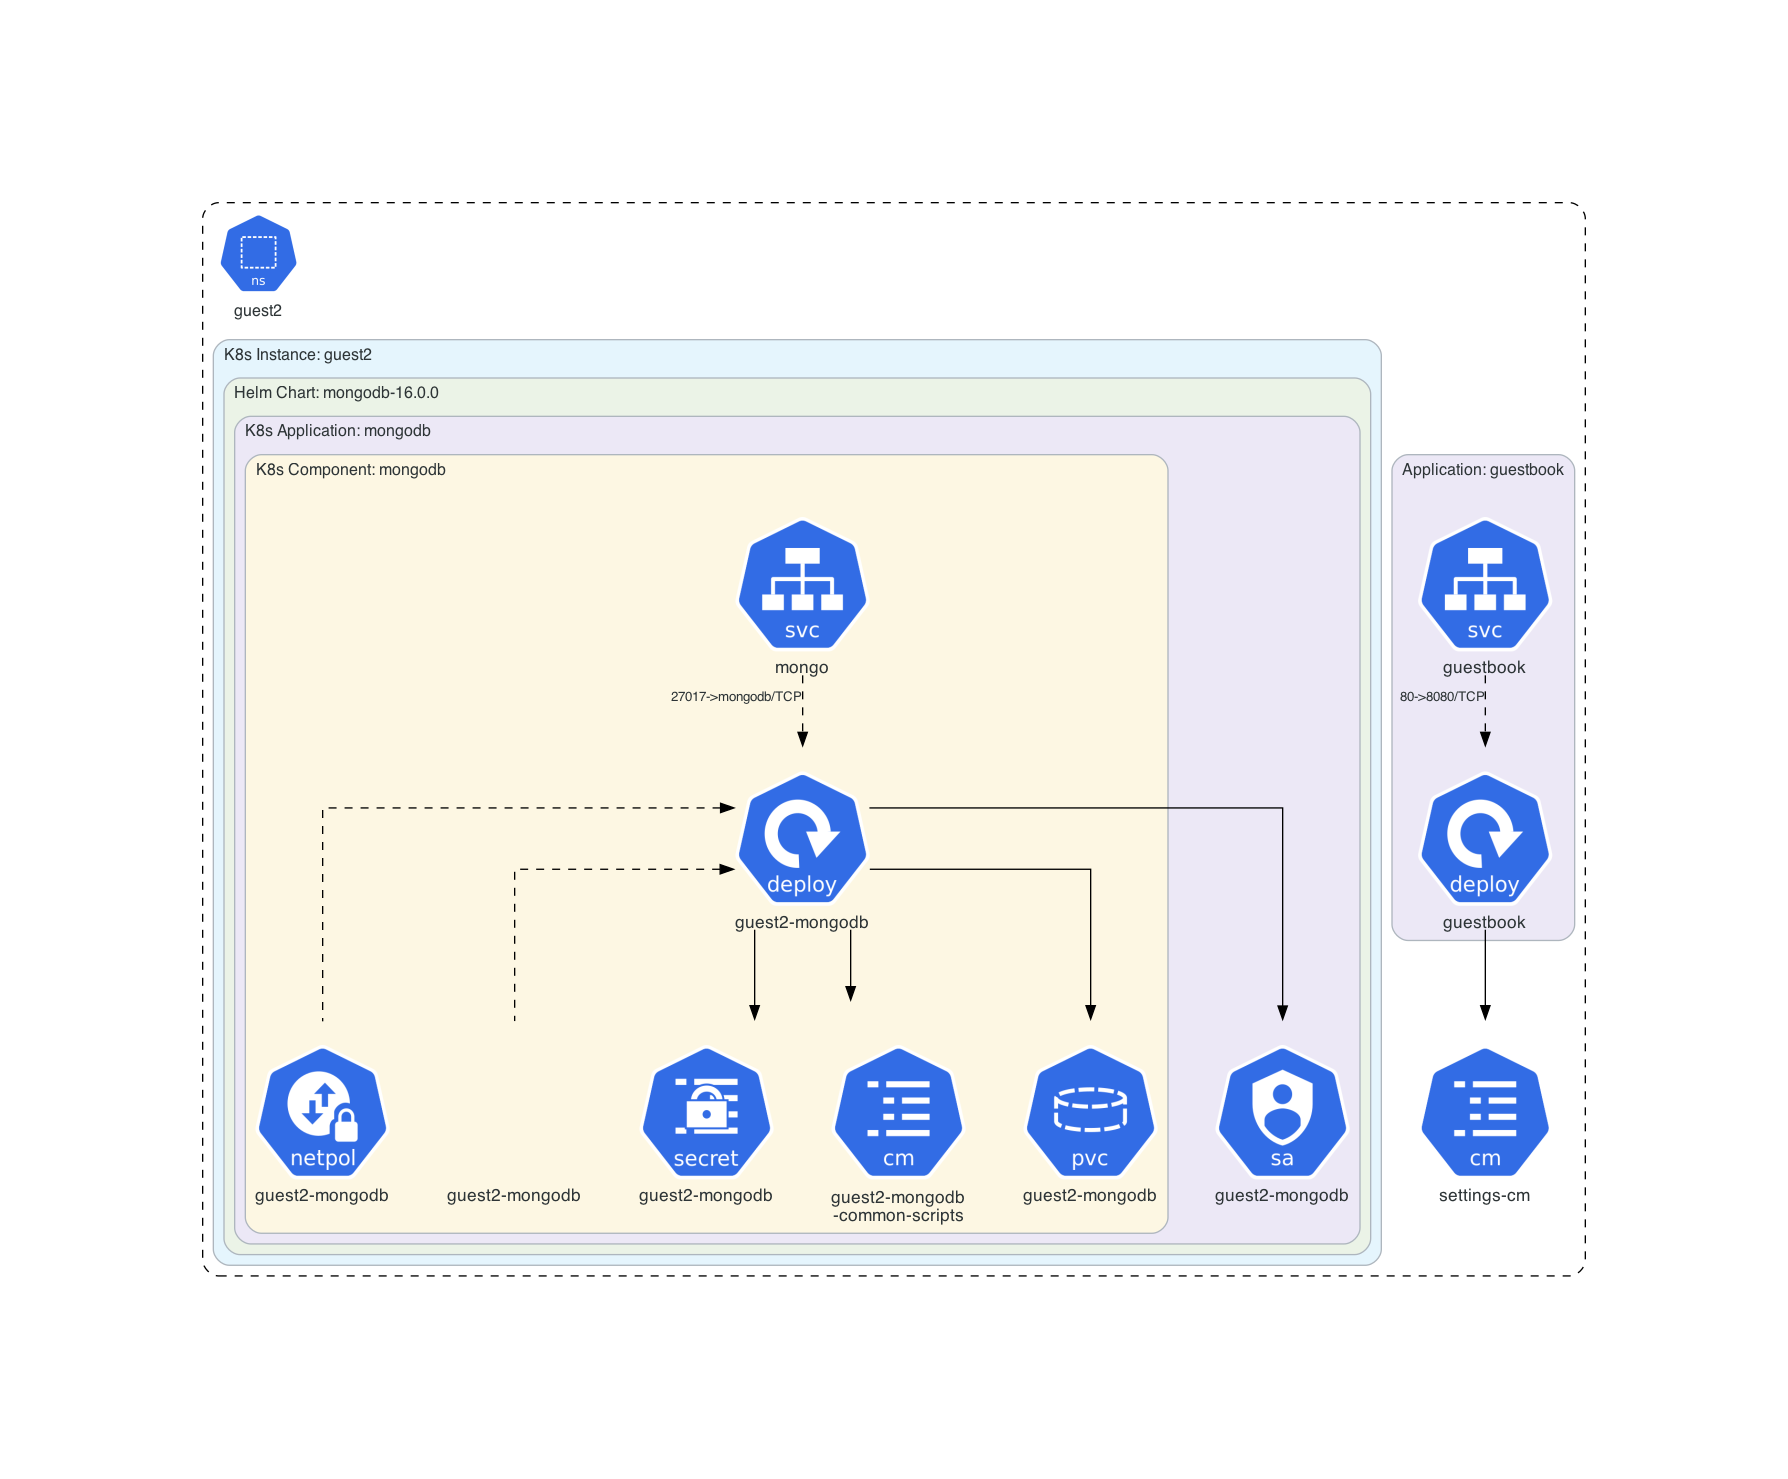
5. Add MongoDB via Helm Dependency
In the previous step we managed the mongoDB deployment and service, but there is a great Helm chart which does exactly that. Let’s try using Bitnami’s MongoDB chart as a dependency for our guestbook chart.
Duplicate your chart folder and rename it to guestbook-mongo-dep. Remove your Mongo deployment and service templates.
Add the Bitnami Repository
Add the Bitnami repo (https://charts.bitnami.com/bitnami) to your local helm instance and update it. For reference, check the docs: Bitnami MongoDB Helm Chart
Hint
Take a look at https://helm.sh/docs/helm/helm_repo/ and the referenced commands.
Solution
helm repo add bitnami https://charts.bitnami.com/bitnami
helm repo update
In the Chart.yaml, define the bitnami MongoDB in version 18.1.1 as a dependency.
Solution
dependencies:
  - name: mongodb
    repository: https://charts.bitnami.com/bitnami
    version: 18.1.1
Modify our guestbook chart
Now we have to update the values.yaml accordingly. This means we have to add the mongodb section with the necessary values of the bitnami chart. Try to figure out which values are needed based on the overview at https://artifacthub.io/packages/helm/bitnami/mongodb#parameters. Remember: We need to set the (admin) username and password and the service name should be mongo.
Info
In the previous step, we used the prefix guestbook for our settings in the values.yaml file. Now this makes more sense:
If someone would include our chart as dependency in another chart, they would be able to override the settings with their own values without conflicts to other dependecies or settings.
For this reason it makes sense to use a prefix for the settings of a specific chart.
Hint
Look for the following parameters: rootUser, rootPassword, Service…
Solution
mongodb:
  auth:
    rootPassword: mongouser
    rootUser: super-secret
  service:
    nameOverride: mongo
As you may noticed, the rootPassword and rootUser are redundant to the definitions we have definied in the mongo block in the values.yaml. We can remove them, but we need to update their occurences in the templates.
Update the ConfigMap (or the Secret if you made the Bonus task earlier).
Bonus: You can also use the value for the service name in the ConfigMap, but be sure that a default will be applied by helm if the value is not set.
Solution
apiVersion: v1
data:
  app.yaml: |
    backend: mongo
    configuration:
      mongo:
        host: {{ .Values.mongodb.service.nameOverride | default "mongodb" | quote }}
        port: "27017"
        user: "{{ .Values.mongodb.auth.rootUser }}"
        password: "{{ .Values.mongodb.auth.rootPassword }}"
kind: ConfigMap
metadata:
  name: settings-cm
  namespace: {{ .Release.Namespace }}
Apply the new chart
First, we have to build the dependency into our chart by running helm dependency build ./guestbook-mongo-dep/. After that, we can apply the new chart with helm install guest2 ./guestbook-mongo-dep/ -n guest2 --create-namespace.
Check the Deployment
The Bitnami Chart solves a few issues for us. First, it takes care of the volume management. By running kubectl get pvc,pv, we can see that the mongoDB has already a persistance layer. Second, it also handles the service creation (kubectl get pvc,pv).
What else?
By looking at MongoDB Parameters, we can notice, that the chart could also use an exisiting secret for the credentials.
Bonus Task: Use Secrets for Senstive Information
As a bonus task you can try to create a secret for the password with Helm and mount the values into our guestbook application instead of writing them into the configmap. You can also try to use this secret as a reference for the bitnami chart afterwards. Happy hacking!
Hint
The secret creation could look like this:
apiVersion: v1
kind: Secret
metadata:
  name: mongo-secret
  namespace: <to-do>
type: Opaque
data:
  mongodb-root-password: <value>
          env:
        - name: TP_CONFIGURATION_MONGO_PASSWORD
          valueFrom:
            secretKeyRef:
              key: mongodbroot-password
              name: mongo-secret